So, the Blog Hop on Sunday went less smoothly than the first one.. I'm so sorry if you tried to get round to see everyone's pages and came across problems here and there.. Nonetheless, there were again some beautiful scrapbook layouts to see and inspiring ideas to file away for future use!
I'd just like to share a page I made last week - it's of my two boys and their little friend, thoroughly absorbed in their game in a patch of dirt in the garden. Simple pleasures!
The papers are from the versatile Sweet Pea Designer Series Paper stack (£19.50 for 48 double-sided sheets - from the mini-catalogue). If you read this post last Saturday, you'll have seen close-ups of the chipboard lettering (On Board Loads of Letters - £10.25 for three 12x12" sheets) and the orange-red 'Friends' embellishment, made using the beautiful Vintage Vogue stamp set (£19.95 - from the mini-catalogue).
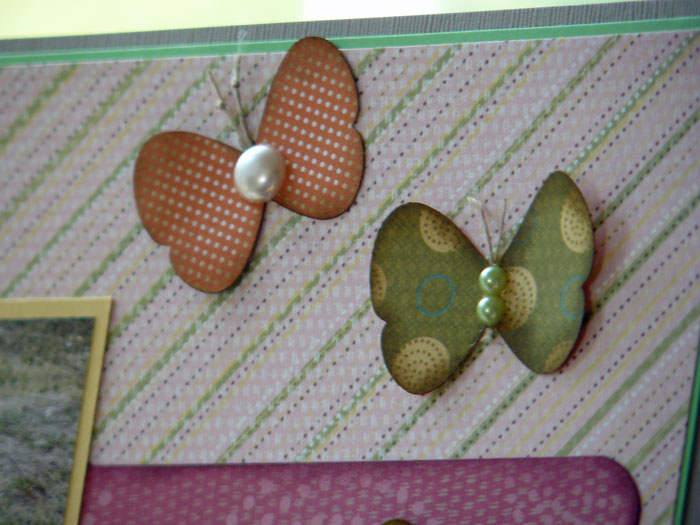
Here's a close-up of those butterflies:
These were punched, using the Butterfly punch (£12.50) from scraps of Sweet Pea papers, inked with Soft Suede ink and given antennae made from small pieces of Linen Thread (£3.25 for 13.7 metres). The gems are non-SU! but are very similar to those available in the Stampin' Up! Pretties Kit (£23.25 for a huge selection of flowers, pearls, beads and other lovely pieces).
If you are interested in buying any of the above products - or any others, of course - please don't hesitate to contact me and I'll be delighted to help you.
Thanks for visiting,
Sarah x
Upcoming Classes
Thursday 9th June: 10.00-12.30: Cardmaking.. cards for men using the Plane & Simple stamp set.
Thursday 23rd June: 9.30-12.30: Scrapbooking.. we'll be continuing with our 8"x8" mini book, theme: Book of Me!
Showing posts with label Sweet Pea. Show all posts
Thursday, 19 August 2010
Sunday, 1 August 2010
Welcome to the Two-Step Stampin' Scrappin' Blog Hop!!
Happy Sunday.. it's 1st August, which means Stampin' Up!'s 'Two-Step into Fabulous' special promotion starts today! As explained in my previous post, Stampin' Up! are offering a delicious 20% off selected Two-Step Stampin' sets from 1st to 31st August.
In Two-Step Stamping, an image is made up from two separate stamps. This enables the two parts of the image to be stamped in different colours, or shades of the same colour, giving the image that extra dimension and impact!
Though fantastic for card-making, these stamps sets are also perfect for your scrapbooking - and today I'd like to present a very special Two-Step Stampin' Scrappin' Blog Hop to show you how these lovely sets can be used on your layouts.
We have ten blogs for you to work your way round, starting here! Each blog will contain a link to the next one on the Hop.. but if there are any problems with links, you'll find the full list at the end of this post.
Meanwhile, here's my scrapbook page:
All of the papers used are from the Sweet Pea Designer Paper stack. I stamped the Greenhouse Garden flowers, starting with a pale colour, then rolling the edges over a darker ink pad to add some contrast (this is called the 'rock & roll' technique!). I then used the Stamp-a-ma-jig tool to perfectly align the second stamp on top of the first. This adds the darker details to the flowers.
I added glitter glue to the flower centres, curled them a little, then mounted them on foam pads. The chipboard letters were pressed onto a Cameo Coral inkpad, then covered in glitter glue.
I made the tags from scraps of Sweet Pea papers, rounding the corners and inking the edges. The scalloped part was made using the Scallop Oval punch and folding in half. 'Photo' was stamped with the Just Perfect alphabet stamps. I love this set - it's just perfect for titles!
OK.. so your next stop on the Hop is to Stamping Scene, where Zoe will be using Greenhouse Garden and Big Bold Birthday stamp sets.
In case you get lost on the way, the full list is below:
1. Seaside Stampers (Sarah) - Greenhouse Garden
2. Stamping Scene (Zoe) - Greenhouse Garden
3. Creativity Is Key (Emma) - Loads of Love
4. Cards and Creations (Pat) - Trendy Trees
5. Stampin' the City (Cheryl) - Bird on a Branch and Tiny Tags
6. Taylor-Made Cards (Debbi) - Trendy Trees and Tiny Tags
7. Make, Do and Gem (Gemma) - Greenhouse garden
8. Tea Cup Designs (Karin) - Loads of Love
9. Stampaholix (Carolyn) - Greenhouse Garden
10. Feeling Crafty (Bekka) - Greenhouse Garden, Tiny Tags and Bird on a Branch
Have fun, and thanks so much for your visit!!
Sarah x
P.S. There'll be another Hop on 15th August.. hope to see you then!
Thursday, 22 July 2010
Thank you, teacher!
It's the last day at nursery for my boys tomorrow, so I made a couple of quick Thank You cards for the staff who have been wonderful this year.
The first one was totally inspired by a box of chocs I spotted in the Co-op yesterday.. and just had to buy for Charlie's teacher, mainly because of the matching-card-making potential.
I was instantly thinking colour schemes.. 'Hmm, looks like Choc Chip, Cameo Coral and Very Vanilla'... shortly followed by.. 'Hey, I can use my new So Swirly wheel!'
Here's what I came up with, anyway. I couldn't resist adding a splash of Old Olive and some Sweet Pea felt pieces.
Stamps - So Swirly wheel, Sincere Salutations
Inks - Cameo Coral, Chocolate Chip
Punches - Scallop Edge, Oval, Scallop Oval
Embellishments - Sweet Pea felt pieces, green rhinestones (non-SU!)
My second card had to be super-quick as I was running out of time this afternoon.
Paper - Sweet Pea Designer Series Paper Stack
Stamps - Flight of the Butterfly
Punch - Butterfly
Embellishment - green rhinestones (non-SU!), Diamond Stickles (non-Su!)
You know what? In hindsight I think the second one is a bit plain.. it could do with something else.. more butterflies maybe.. perhaps a scrap of the patterned paper with a bit more 'going on'? Oh well, too late - it's been handed in!
The first one was totally inspired by a box of chocs I spotted in the Co-op yesterday.. and just had to buy for Charlie's teacher, mainly because of the matching-card-making potential.
I was instantly thinking colour schemes.. 'Hmm, looks like Choc Chip, Cameo Coral and Very Vanilla'... shortly followed by.. 'Hey, I can use my new So Swirly wheel!'
Here's what I came up with, anyway. I couldn't resist adding a splash of Old Olive and some Sweet Pea felt pieces.
Supplies:
Cardstock - Cameo Coral, Chocolate Chip, Very Vanilla, Old OliveStamps - So Swirly wheel, Sincere Salutations
Inks - Cameo Coral, Chocolate Chip
Punches - Scallop Edge, Oval, Scallop Oval
Embellishments - Sweet Pea felt pieces, green rhinestones (non-SU!)
My second card had to be super-quick as I was running out of time this afternoon.
Supplies:
Cardstock - Old Olive, Rose Red, Pumpkin PiePaper - Sweet Pea Designer Series Paper Stack
Stamps - Flight of the Butterfly
Punch - Butterfly
Embellishment - green rhinestones (non-SU!), Diamond Stickles (non-Su!)
You know what? In hindsight I think the second one is a bit plain.. it could do with something else.. more butterflies maybe.. perhaps a scrap of the patterned paper with a bit more 'going on'? Oh well, too late - it's been handed in!
Tuesday, 20 July 2010
More scrapbooking with Sweet Pea
It's been a while since I did any scrapbooking.. card-making seems to have taken over for the last few weeks. But I've been itching to get back to it, and yesterday I came up with this:
The photos were taken in our garden and at the Chalk Farm Hotel where I was experimenting with the macro setting on my camera. The patterned paper is from the Sweet Pea Designer Series Paper stack - I used one sheet and cut out a couple of butterflies from another and stuck them on with foam pads. Can you spot them?
I used Old Olive cardstock to mat the photos, stamping it with flowers from Baroque Motifs and Flight of the Butterfly stamp sets. I layered the Old Olive with So Saffron cardstock, using the Scallop Edge punch on the top and bottom edges.
The 'Summer' part of the title was made using Stampin' Up!'s chipboard letters pack - On Board Loads of Letters, £10.25 for three 12x12" sheets in various designs. I pressed each letter on to an ink pad - Ruby Red and Old Olive - until the letters were covered in ink.
The 'garden' letters were stamped using the Just Perfect alphabet stamps - Ruby Red ink on So Saffron cardstock - then cutting out each letter. I gave the letters an aged look by dabbing around the edges with an orangey-yellow chalk ink, then creasing them up a bit.
To complete the distressed look, I ran the blades of a pair of scissors around the edge of the patterned paper and turned back the corners before adhering to a 12x12" piece of Summer Sun cardstock. The Sweet Pea designer papers are double-sided with coordinating patterns on each side, so it's nice to be able to see both sides of the paper in this way!
It feels good to be scrapping again.. watch this space for news of a scrapbooking blog hop coming soon!
Thanks for stopping by,
Sarah x
The photos were taken in our garden and at the Chalk Farm Hotel where I was experimenting with the macro setting on my camera. The patterned paper is from the Sweet Pea Designer Series Paper stack - I used one sheet and cut out a couple of butterflies from another and stuck them on with foam pads. Can you spot them?
I used Old Olive cardstock to mat the photos, stamping it with flowers from Baroque Motifs and Flight of the Butterfly stamp sets. I layered the Old Olive with So Saffron cardstock, using the Scallop Edge punch on the top and bottom edges.
The 'Summer' part of the title was made using Stampin' Up!'s chipboard letters pack - On Board Loads of Letters, £10.25 for three 12x12" sheets in various designs. I pressed each letter on to an ink pad - Ruby Red and Old Olive - until the letters were covered in ink.
The 'garden' letters were stamped using the Just Perfect alphabet stamps - Ruby Red ink on So Saffron cardstock - then cutting out each letter. I gave the letters an aged look by dabbing around the edges with an orangey-yellow chalk ink, then creasing them up a bit.
To complete the distressed look, I ran the blades of a pair of scissors around the edge of the patterned paper and turned back the corners before adhering to a 12x12" piece of Summer Sun cardstock. The Sweet Pea designer papers are double-sided with coordinating patterns on each side, so it's nice to be able to see both sides of the paper in this way!
It feels good to be scrapping again.. watch this space for news of a scrapbooking blog hop coming soon!
Thanks for stopping by,
Sarah x
Thursday, 15 July 2010
A quick thank you
I've been terrible at sending thank you cards to friends and family lately.. but the other day I made a heap of little cards that were so quick and easy, there really is no excuse any more!
These were made using the Two-step Bird punch with a selection of patterned paper scraps - the two on the right are using papers from the Sweet Pea Designer Series Papers. The greeting is from the Sincere Salutations stamp set. I added little green sticky gems for eyes and inked the edges.. and that's it!
Thanks for visiting :)
Sarah x
These were made using the Two-step Bird punch with a selection of patterned paper scraps - the two on the right are using papers from the Sweet Pea Designer Series Papers. The greeting is from the Sincere Salutations stamp set. I added little green sticky gems for eyes and inked the edges.. and that's it!
Thanks for visiting :)
Sarah x
Wednesday, 7 July 2010
A special birthday card.. and the one that got away
This week I had two special birthday cards to make - one for my dear mum-in-law's 60th birthday which was on Monday, and one which was commissioned by a Toddler Group friend for her mother-in-law who is 98 at the end of the month.
Both cards needed to say 'Mum' and 'Happy 60th/98th Birthday' as appropriate. Not having the alphabet stamps needed to stamp this out, I 'cheated' and printed my greetings on patterned paper. Both cards used pink papers from the Sweet Pea Designer paper stack, along with the 'Baroque Motifs' stamp set (my absolute favourite at the moment). I also used the Two-Step Bird punch on my mum-in-law's card.
The Baroque Motif was stamped with Versamark and embossed with holographic embossing powder so it catches the light much better than the photo shows.
And the one that got away...? Well, what a numpty I am. In my haste to get to Toddler Group this morning with the 98th birthday card I forgot to photograph it. It was similar to the one above.. but the image was stamped in Old Olive on the houndstooth check paper, and instead of the bird it was festooned with pinky-lilac paper hydrangeas (from Prima I believe). I'd also printed the 'Mum' and '98th' a bit bigger, which looked better I think.
My second monthly card-making class is this Friday - and we'll be making cards using the Baroque Motifs set.. can't wait! Also, I have lots of exciting plans for September, including an idea for a scrapbooking class which I've been nurturing for soooo long.. I'll share more details very soon.
Meanwhile.. if you are interested in coming to a class, or purchasing anything from the Stampin' Up! catalogue, I'd be delighted to hear from you.
Both cards needed to say 'Mum' and 'Happy 60th/98th Birthday' as appropriate. Not having the alphabet stamps needed to stamp this out, I 'cheated' and printed my greetings on patterned paper. Both cards used pink papers from the Sweet Pea Designer paper stack, along with the 'Baroque Motifs' stamp set (my absolute favourite at the moment). I also used the Two-Step Bird punch on my mum-in-law's card.
The Baroque Motif was stamped with Versamark and embossed with holographic embossing powder so it catches the light much better than the photo shows.
And the one that got away...? Well, what a numpty I am. In my haste to get to Toddler Group this morning with the 98th birthday card I forgot to photograph it. It was similar to the one above.. but the image was stamped in Old Olive on the houndstooth check paper, and instead of the bird it was festooned with pinky-lilac paper hydrangeas (from Prima I believe). I'd also printed the 'Mum' and '98th' a bit bigger, which looked better I think.
My second monthly card-making class is this Friday - and we'll be making cards using the Baroque Motifs set.. can't wait! Also, I have lots of exciting plans for September, including an idea for a scrapbooking class which I've been nurturing for soooo long.. I'll share more details very soon.
Meanwhile.. if you are interested in coming to a class, or purchasing anything from the Stampin' Up! catalogue, I'd be delighted to hear from you.
Sunday, 20 June 2010
Happy Father's Day!
It's been a busy week but I just about managed to get a couple of Father's Day cards completed in time (well almost... sorry Dad, yours will arrive tomorrow). I used more of the gorgeous papers from the Sweet Pea paper stack, along with the Butterfly and Two-Step Bird punches. The letters were cut using the Cuttlebug and Red Tag Sale alphabet dies, then embossed using Cuttlebug embossing folders.
I'm loving these papers - such a great combination of colours and patterns!
Thanks for visiting..
Sarah x
I'm loving these papers - such a great combination of colours and patterns!
Thanks for visiting..
Sarah x
Saturday, 19 June 2010
My first workshop...
I have to admit I was pretty nervous in the run-up to my first home workshop.. but I really needn't have worried! Teresa was the perfect hostess and I knew several of the guests already from the Hailsham crop. Unexpectedly, though, the ladies were so absorbed by the Idea Book & Catalogue and my card samples that we just didn't get around to making anything! It was a fun evening nonetheless, and I can't wait to see what my first customers create with their new Stampin' Up! purchases.
Here's a layout I made recently using the versatile 'Sweet Pea' double-sided paper stack. It features my first son as a nine-month-old (aah, he was so cute!).
Papers - Sweet Pea paper stack
Stamps - My Sweet Pea
Punch - Butterfly; Eyelet Border
Ink - Versamark
Other - White Embossing Powder, Button, Thickers letter stickers, sheer white ribbon, Liquid Pearls
Techniques:
I misted the butterfly with water and scrunched it up, unfolded it and allowed it to dry.
The flowers were stamped with Versamark and embossed with white embossing powder.
I'll be back tomorrow with a Father's Day card..
Thanks for looking!
Sarah x
Here's a layout I made recently using the versatile 'Sweet Pea' double-sided paper stack. It features my first son as a nine-month-old (aah, he was so cute!).
Supplies:
Cardstock - Whisper White, Bashful Blue, Chocolate Chip, Old OlivePapers - Sweet Pea paper stack
Stamps - My Sweet Pea
Punch - Butterfly; Eyelet Border
Ink - Versamark
Other - White Embossing Powder, Button, Thickers letter stickers, sheer white ribbon, Liquid Pearls
Techniques:
I misted the butterfly with water and scrunched it up, unfolded it and allowed it to dry.
The flowers were stamped with Versamark and embossed with white embossing powder.
I'll be back tomorrow with a Father's Day card..
Thanks for looking!
Sarah x
Saturday, 5 June 2010
Scrapbooking with Sweet Pea
So today I attended an all-day crop run by two lovely ladies, Becky and Teresa, in Hailsham. What a friendly bunch they were - it was such fun! I took along my new Stampin' Up! goodies, along with a few photos of the boys, and got to work on a layout.
Here's what I made:
Cardstock: Whisper White; Old Olive; So Saffron, Pretty in Pink
Paper: Designer Series Paper Stack - Sweet Pea
Embellishments: Stitched Felt - Sweet Pea
Punch: Scallop Edge
Non-SU!: American Crafts Thickers
The ladies were really interested in the products I was using, had a thorough browse through the catalogues and were particularly impressed with the Butterfly punch... in fact we arranged a home workshop in a couple of weeks - I'm so excited!
I have another layout in progress which I'll be back to share soon.
Sarah x
Here's what I made:
Cardstock: Whisper White; Old Olive; So Saffron, Pretty in Pink
Paper: Designer Series Paper Stack - Sweet Pea
Embellishments: Stitched Felt - Sweet Pea
Punch: Scallop Edge
Non-SU!: American Crafts Thickers
The ladies were really interested in the products I was using, had a thorough browse through the catalogues and were particularly impressed with the Butterfly punch... in fact we arranged a home workshop in a couple of weeks - I'm so excited!
I have another layout in progress which I'll be back to share soon.
Sarah x
Subscribe to:
Posts (Atom)