Upcoming Classes

Thursday 9th June: 10.00-12.30: Cardmaking.. cards for men using the Plane & Simple stamp set.
Thursday 23rd June: 9.30-12.30: Scrapbooking.. we'll be continuing with our 8"x8" mini book, theme: Book of Me!
Showing posts with label Just Perfect Alphabet. Show all posts

Tuesday, 15 March 2011

More Scrapbooking with Play Date papers

Here's the second layout I'll be using in this month's Scrapbook Club...

And here's a closer view:

I've used Play Date Designer Series Papers, along with matching cardstock and chipboard shapes from the On Board Mix & Match chipboard shapes set (£8.95 for three 12" x 12" sheets with over 100 pieces). I inked the heart and tree by pressing them into the ink pads, then topping up the colour using sponge daubers.

The blue letters were die-cut using Cuttlebug Red Tag Sale dies and the other letters were stamped using Just Perfect alphabet.

If you'd like to join in with Scrapbook Club this month, please check out this page for all the details.

Also, don't forget the Tea, Cake & Craft Party on Saturday 2nd April - tickets are selling fast and places on the Make & Takes are limited.. so if you'd like to come, please get in touch as soon as possible to book your place and buy your ticket. Tickets include a free Mini-catalogue, make & take, tea, cakes, and chances to win a fabulous prize, so you really won't want to miss out! Click on the picture at the top of the page for all the details.

See you soon!

Sarah x

Edited to add: In case anyone happens to revisit this page, after comments received about the title, I decided to alter the layout to include the word 'tree'. Apparently, at first glance, it looked as if I was being rather rude to poor Harry.. ;o) So I have changed the photos to show the new improved layout!

Monday, 31 January 2011

Come and join me in February!

Hi there!

Fancy joining me for a card-making class or scrapbooking session in February? If so, now's the time to book your place.. I've just updated the Class Dates and Details page so you can see what's happening from now til June.

February's Card-making Classes take place on Thursday 10th and Saturday 12th February. These classes will be showcasing two more of the Sale-a-bration stamp sets - Bliss and Punch Bunch - along with the chance to make a Valentine card using the very sweet Love You Much stamp set!

Scrapbook Club this month takes place on Thursday 24th and Saturday 26th February.. and we'll be continuing with the Love theme by making a chipboard album dedicated to someone (or something) special. You will be able to customise your kit using any of the colours from the delicious Subtles Collection - and use the fabulous Stampin' Up! Colour Coach to help you devise your perfect colour scheme!

Just a quick reminder, too, that Sale-a-Bration is now half-way through! You have til 28th February to earn yourself a FREE stamp set.. if you'd like more information, please check out my previous post here - and then click on the Sale-a-Bration label in the side-bar to see plenty of projects made using the sets on offer. If you would like a Sale-a-Bration leaflet, email me with your address and I'll send you a copy!

I'll be back tomorrow to announce the winner of January's Prize Draw.. good luck everyone!

And finally...


A birthday card for a friend's little girl.. happy birthday Rosie!

Colours: Pear Pizazz, Melon Mambo, Tempting Turquoise, Pretty in Pink.
Stamps: Punch Bunch (Sale-a-Bration), Party This Way, Just Perfect alphabet
DSP: Brights Designer Series Paper Pattern Stack (Daffodil Delight)

Thanks for your visit!

Sarah x

Thursday, 27 January 2011

January Scrapbook Club - Project Complete!

As promised, here are a few more pictures of this month's Scrapbook Club project. A big thank you to the ladies who joined me this morning to have a go at the project.. I can't wait to see your finished books.. next month ok? :o)

So here's my cover:


My colour scheme is Melon Mambo, Tempting Turquoise, Daffodil Delight and Old Olive. All the patterned papers are from the Brights Designer Series Paper (DSP) Pack and the Newsprint DSP pack.

The 'g' is a chipboard letter, inked and coated in Crystal Effects to make it shiny. The other letters (and numbers) were die-cut on my Cuttlebug. The tiny butterflies are from the 'So Happy For You' (Sale-a-bration) set.

First two pages:

{Eek! Wish I'd not left a 'halo' effect round my hair.. oops!}


I've used the Bliss (Sale-a-bration) set to stamp the background.

Thought I'd try doodling my title letters and the speech bubble (being more adventurous already, see? lol).

Second two pages (I showed you the pair yesterday, so here they are individually):


I used 'faux stitching' around the edges of the dotty paper - used the paper piercing template from the Mat Pack to pierce holes all the way round, then joined them up with a black journaling pen.. simple!

The bunting was made using a stamp from 'Party This Way', strung together with Linen Thread.

Third pair of pages:


The background was stamped with 'Sweet Summer' (another Sale-a-bration set). I doodled the scalloped boxes straight on to the DSP, then cut them in half and flipped one side round to show the other pattern (the papers are all double-sided). I used the Paper Piercing Template to help me sew the pieces together.

Fourth pair of pages:


The background was stamped with 'Just Believe' stamps.

And finally..(phew, nearly there) the fifth pair of pages:


Here, I made a pocket from DSP, folded over and punched with the Scallop Trim Border punch, for my tags. The colourful strips at the top of these pages were sliced from the cover of a Dulux paint catalogue.. appropriate to the theme, I thought!

Pages were stuck together back-to-back on three sides to form pockets for my tags. I used a circle punch to cut the semi-circles to allow easy removal of the tags. The numbers on each page were cut from a sheet of Newsprint DSP.

I hope you liked my project! Saturday ladies.. now you know what you have in store! ;o)

If you have any questions, please don't hesitate to ask in the Comments box (by the way, anyone should be able to comment now.. I've changed the settings!).


Thanks for visiting,

Sarah x

Saturday, 18 December 2010

Scrapbook Club - undaunted by snow!

Well, it was touch and go this morning... should I call off Scrapbook Club or carry on regardless of the white stuff? In the end, thanks to a few quick phone calls, we decided to go ahead. Thank you ladies for braving the elements - we had snow, hailstones like marbles and the occasional blizzard, but nobody batted an eyelid!

So this month's project was a Birthday Planner, to help us keep on top of all those birthdays and other occasions throughout the year which call for a hand-crafted card to be made and sent with love. Here's my creation:

It took me a good couple of weeks to get this project finished.. and a lot of trial and error.. but I'm pleased with how it turned out - and even more thrilled with how the ladies managed to create theirs today in under three hours! It was pretty intense work but worth the effort I think.

Here's a peek at the first two inside pages, showing the calendar for January on the left and a pocket for holding a couple of cards on the right...

...and the little pocket at the back - for storing envelopes or maybe a little address book..?


I've made a few changes to the class schedule from January onwards... full details can be found on the Card-making Classes and Scrapbook Club pages in the side-bar... take a look and do book early to benefit from early-bird discounts and to secure your place!

Details of class projects for the next few months will be available soon.. or at least as soon as I've finished my Christmas cards and thought about what we're eating one week from today..!

Merry Christmas everyone.. and I hope to see you soon! :o)

Sunday, 28 November 2010

A Christmas Planner with Jolly Holiday DSP

Yesterday at Scrapbook Club we made Christmas Planners.. and appropriately enough, within half an hour the snowflakes had started to fall! Undaunted we carried on..

 (L-R: Becky, Teresa and Janette)

...work in progress..

..and here's one I made earlier!


Here's what we used:
2 pieces of thin chipboard
6 small square envelopes (113 x 113mm)
Jolly Holiday Designer Series Papers
Cherry Cobbler, Old Olive and Very Vanilla cardstock

Stamps:
Just Perfect alphabet
Contempo Christmas
Serene Snowflakes
Just Believe
Basic Phrases
Dasher
Punch Potpourri


The planner was bound together using the Bind-it-All and 5/8" white O-wires.

Next Classes:
Saturday 11th December: Card-making with Notably Ornate stamps and Love Letter/Newsprint Designer Series Papers (non-Christmassy cards!).
As this is the rescheduled class from Friday 10th Dec, I'm holding the price at £5.

Saturday 18th December: Scrapbook Club - Making a Birthday Planner - get organised for 2011 with this handy birthday book and never forget anyone's special day again!
Price £10 - includes full kit and instructions (sneak preview of project and kit coming soon - it's in progress!).

I'm taking bookings for both of these classes now.
If you'd like to come, please let me know by 5th December.
I will need payment in advance please, so that I can purchase and prepare resources for your project kit.
 You can pay by Paypal (email address: slpiggott73@gmail.com - mark it as a 'Personal Payment Owed') or cheque (payable to Sarah Piggott - email me for my address).

Many thanks.. I hope to see you soon!

Sarah x

Sunday, 22 August 2010

Colour Inspiration

Inspiring colour combinations can pop up when you least expect it.. shopping in Waitrose a couple of weeks ago, I spotted a little selection pack of Houmous pots in the most delicious colours - so, naturally, I had to buy it!


I've had this bit of packaging stuck on my wall for a while now, waiting for a chance to use the colour combination. So this morning I used it to make a card for my Father-in-law whose birthday is tomorrow:


The colours I used are Ruby Red, Rich Razzleberry and Old Olive.

Supplies:
Stamps - Darling Dots, Basic Phrases, Just Perfect
Inks - Ruby Red, Rich Razzleberry, Old Olive, Soft Suede
Punches - Scallop Circle, 1 1/2" Circle, 1" Circle

The Houmous was pretty tasty too, by the way.. :o)

Sarah x

Thursday, 19 August 2010

Dabbling in the dirt

So, the Blog Hop on Sunday went less smoothly than the first one.. I'm so sorry if you tried to get round to see everyone's pages and came across problems here and there.. Nonetheless, there were again some beautiful scrapbook layouts to see and inspiring ideas to file away for future use!

I'd just like to share a page I made last week - it's of my two boys and their little friend, thoroughly absorbed in their game in a patch of dirt in the garden. Simple pleasures!


The papers are from the versatile Sweet Pea Designer Series Paper stack (£19.50 for 48 double-sided sheets - from the mini-catalogue). If you read this post last Saturday, you'll have seen close-ups of the chipboard lettering (On Board Loads of Letters - £10.25 for three 12x12" sheets) and the orange-red 'Friends' embellishment, made using the beautiful Vintage Vogue stamp set (£19.95 - from the mini-catalogue).

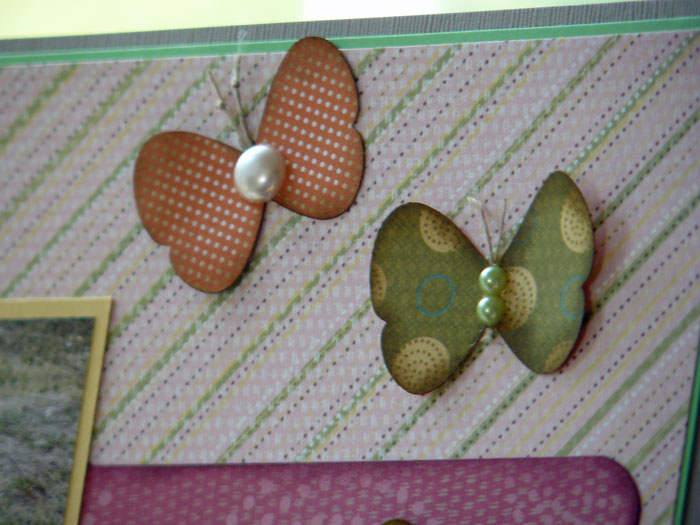
Here's a close-up of those butterflies:


These were punched, using the Butterfly punch (£12.50) from scraps of Sweet Pea papers, inked with Soft Suede ink and given antennae made from small pieces of Linen Thread (£3.25 for 13.7 metres). The gems are non-SU! but are very similar to those available in the Stampin' Up! Pretties Kit (£23.25 for a huge selection of flowers, pearls, beads and other lovely pieces).

If you are interested in buying any of the above products - or any others, of course - please don't hesitate to contact me and I'll be delighted to help you.

Thanks for visiting,

Sarah x

Sunday, 15 August 2010

Two-Step Stampin' Blog Hop - Part 2!

Thank you so much for dropping by.. If you're here for the Blog Hop, you've come to the right place! If you've stumbled upon me by accident, well you're most welcome!

In a nutshell, I and some lovely ladies at In Love With Stamping arranged this little event to celebrate Stampin' Up!'s August promotion - 20% off selected Two-Step Stampin' Stamp sets... click the picture to the right to find out more. The focus is on using these stamps on your scrapbook layouts.

Here's the running order of today's hop, along with the stamp sets you can expect to see in action:

1. Sarah (SarahLP) - Bird on a Branch & Greenhouse Garden (that's me!)

2. Helen (langara) - Something Sweet

3. Anthea (scrappydiva) - Greenhouse Garden

4. Caz (stampingcaz) - Big Bold Birthday

5. Rachel - Trendy Trees

6. Caroline Skinner - Tiny Tags & Loads of Love

7. Jo (Scrapbookparty) -Something Sweet


8. Kara (KaraM) - Big Bold Birthday and Greenhouse Garden

9. Sue (Frankiesue) - Trendy Trees


So here's my page...


The layout is based on a sketch from this month's Scrapbook Magazine. If you read my previous post, you'll recognise those chipboard letters.. :o) 

Here's the Bird on a Branch in more detail:


I stamped the Bird with So Saffron ink and used a Sponge Dauber to add Ruby Red to the head and tail.


And here are the Greenhouse Garden flowers in close-up:


I used the 'rock & roll' technique to darken the edges of the red flower, then added some Champagne Shimmer Paint with a Dauber to the centre of the flower (and the journaling spot.. oh, and the branch the bird is sitting on.. once you start adding Shimmer it's hard to stop!).


I hope you enjoyed your visit.. I'd be delighted to read your comments if you have a moment.. By the way, if you missed the first Blog Hop on 1st August, you'll find it here

OK, now your next stop on the Hop is Helen... have a lovely time!


Sarah x

Sunday, 1 August 2010

Welcome to the Two-Step Stampin' Scrappin' Blog Hop!!


Happy Sunday.. it's 1st August, which means Stampin' Up!'s 'Two-Step into Fabulous' special promotion starts today! As explained in my previous post, Stampin' Up! are offering a delicious 20% off selected Two-Step Stampin' sets from 1st to 31st August.

In Two-Step Stamping, an image is made up from two separate stamps. This enables the two parts of the image to be stamped in different colours, or shades of the same colour, giving the image that extra dimension and impact!

Though fantastic for card-making, these stamps sets are also perfect for your scrapbooking - and today I'd like to present a very special Two-Step Stampin' Scrappin' Blog Hop to show you how these lovely sets can be used on your layouts.

We have ten blogs for you to work your way round, starting here! Each blog will contain a link to the next one on the Hop.. but if there are any problems with links, you'll find the full list at the end of this post.

Meanwhile, here's my scrapbook page:


All of the papers used are from the Sweet Pea Designer Paper stack. I stamped the Greenhouse Garden flowers, starting with a pale colour, then rolling the edges over a darker ink pad to add some contrast (this is called the 'rock & roll' technique!). I then used the Stamp-a-ma-jig tool to perfectly align the second stamp on top of the first. This adds the darker details to the flowers.


I added glitter glue to the flower centres, curled them a little, then mounted them on foam pads. The chipboard letters were pressed onto a Cameo Coral inkpad, then covered in glitter glue.

I made the tags from scraps of Sweet Pea papers, rounding the corners and inking the edges. The scalloped part was made using the Scallop Oval punch and folding in half. 'Photo' was stamped with the Just Perfect alphabet stamps. I love this set - it's just perfect for titles!


OK.. so your next stop on the Hop is to Stamping Scene, where Zoe will be using Greenhouse Garden and Big Bold Birthday stamp sets.

In case you get lost on the way, the full list is below:


1. Seaside Stampers (Sarah) - Greenhouse Garden
2. Stamping Scene (Zoe) - Greenhouse Garden
3. Creativity Is Key (Emma) - Loads of Love
4. Cards and Creations (Pat) - Trendy Trees
5. Stampin' the City (Cheryl) - Bird on a Branch and Tiny Tags
6. Taylor-Made Cards (Debbi) - Trendy Trees and Tiny Tags
7. Make, Do and Gem (Gemma) - Greenhouse garden
8. Tea Cup Designs (Karin) - Loads of Love
9. Stampaholix (Carolyn) - Greenhouse Garden
10. Feeling Crafty (Bekka) - Greenhouse Garden, Tiny Tags and Bird on a Branch

Have fun, and thanks so much for your visit!!

Sarah x


P.S. There'll be another Hop on 15th August.. hope to see you then!

Wednesday, 21 July 2010

Two quick cards for men

We have two blokey birthdays this week - Gareth's friend Jez, and his brother Simon - so I've just made a couple of really quick & simple cards for them.

This one uses the Fun & Fast Notes birthday stamp, stamped with Versamark and embossed in white embossing powder. I've also used the Nestabilities Labels One dies, layering Basic Black and Whisper White cardstock.


This one is based on a lovely set of cards I spotted on Emma's blog Devotion to the Dream. The base card is Ruby Red cardstock, A6 size. The letters are stamped with the Just Perfect alphabet in Ruby Red ink, cut out and the edges inked (messily!) with black ink. The white lines were drawn with a white Signo gel pen.

Thanks for looking!

Sarah x

Tuesday, 20 July 2010

More scrapbooking with Sweet Pea

It's been a while since I did any scrapbooking.. card-making seems to have taken over for the last few weeks. But I've been itching to get back to it, and yesterday I came up with this:


The photos were taken in our garden and at the Chalk Farm Hotel where I was experimenting with the macro setting on my camera. The patterned paper is from the Sweet Pea Designer Series Paper stack - I used one sheet and cut out a couple of butterflies from another and stuck them on with foam pads. Can you spot them?


I used Old Olive cardstock to mat the photos, stamping it with flowers from Baroque Motifs and Flight of the Butterfly stamp sets. I layered the Old Olive with So Saffron cardstock, using the Scallop Edge punch on the top and bottom edges.


The 'Summer' part of the title was made using Stampin' Up!'s chipboard letters pack - On Board Loads of Letters, £10.25 for three 12x12" sheets in various designs. I pressed each letter on to an ink pad - Ruby Red and Old Olive - until the letters were covered in ink.

The 'garden' letters were stamped using the Just Perfect alphabet stamps - Ruby Red ink on So Saffron cardstock - then cutting out each letter. I gave the letters an aged look by dabbing around the edges with an orangey-yellow chalk ink, then creasing them up a bit.


To complete the distressed look, I ran the blades of a pair of scissors around the edge of the patterned paper and turned back the corners before adhering to a 12x12" piece of Summer Sun cardstock. The Sweet Pea designer papers are double-sided with coordinating patterns on each side, so it's nice to be able to see both sides of the paper in this way!

It feels good to be scrapping again.. watch this space for news of a scrapbooking blog hop coming soon!

Thanks for stopping by,

Sarah x