Upcoming Classes

Thursday 9th June: 10.00-12.30: Cardmaking.. cards for men using the Plane & Simple stamp set.
Thursday 23rd June: 9.30-12.30: Scrapbooking.. we'll be continuing with our 8"x8" mini book, theme: Book of Me!
Showing posts with label Butterfly punch. Show all posts

Thursday, 10 March 2011

March cardmaking class - Flight of the Butterfly

Thank you ladies for coming to today's class - I loved seeing how you interpreted the cards and really made them your own!

I have to admit, having said we'd use Flight of the Butterfly last month I struggled for a while to come up with anything I was really pleased with.. so I turned to some trusty sources of inspiration to help me out! (Sometimes the mojo takes a little holiday, you know?) ;o)

So here are the cards we made today...

This one (above) was cased from the Idea Book & Catalogue (have I mentioned it's full of wonderful card and scrapbook ideas for you to 'borrow' and adapt as you like..?). The colours I used were Daffodil Delight, Real Red, Tangerine Tango and Pumpkin Pie.


This one (above) was inspired by a card I spotted on SplitCoast Stampers (another valuable source of inspiration when your mojo fails you!) by justbehappy.. love the different shades of pink all together - they are Melon Mambo and Regal Rose with a bit of Pretty in Pink satin ribbon!


And finally, this last one was totally inspired by another one I found on SplitCoast Stampers - although I changed the colour scheme and added the yellow punched strip across the middle. The colours are Tempting Turquoise, Real Red and Daffodil Delight.

All of today's cards were made using colours from the Brights Collection, along with Flight of the Butterfly stamp set, the Butterfly punch and the Scallop Trim Border punch. The Boho Blossoms punch was also used on the second card.

Did you know you can buy cardstock in a Brights assortment... 20 sheets of A4 smooth cardstock (2 each in 10 colours) for £6.25? Let me know if you'd like me to order some.. or any of the products used in this class.. and I'll be very happy to help!

See you soon,

Sarah x

Sunday, 27 February 2011

Scrapbooking with Greenhouse Gala DSP

Oops! For some reason I forgot to share these scrapbook pages.. I did them back in November for Scrapbook Magazine and they were published in issue 52 last month. Most of the papers used were from the Greenhouse Gala Designer Series Paper pack - love the colours and patterns in these papers!

Baby Me:


The hearts were stamped on lined paper from Greenhouse Gala DSP using stamps from the Punch Potpourri Hostess set. I coloured the chipboard letters with Baja Breeze ink and added Crystal Effects for a glossy, raised effect.

@ 37:


The butterfly is also from the Punch Potpourri Hostess set (by the way, you can earn this set FREE when you host a workshop).

Chalk & Cheese:

The green spotty paper on the left was actually from the Jolly Holiday DSP pack - but it seems to go nicely with the Greenhouse Gala paper! These little birds were punched using the gorgeousTwo-Step Bird punch and decorated with buttons from the Brights Designer Buttons pack (£7.75 for 72 buttons).

Thanks for visiting!

Sarah x

Wednesday, 2 February 2011

Gotta love these colours!

Today I needed to make six very quick, simple cards with NO greeting on them... so after some deliberation, here's what I came up with: three in each colourway, butterflies in various papers from the Love Letter DSP pack.


You really can't go wrong with this colour scheme in my opinion! (In fact, it matches our new lounge decor.. coincidence? probably not!)

Riding Hood Red - Baja Breeze - Basic Black - Very Vanilla

Stamps: Very Vintage Stampin' Around Wheel
Punches: Scallop Trim Border; Butterfly
Designer Series Paper: Love Letter

Friday, 28 January 2011

Inspired by Orla

One of my Scrapbook Club ladies arrived yesterday with a brand new Orla Kiely-designed shopping bag from Tesco - only £4 would you believe!

I'd heard something about these bags but, as I don't do the shopping very often (shamefully bad wife that I am), I hadn't actually seen one. Well, I just had to have one! So I sent Gareth off to Tesco's last night with strict instructions to come back with an Orla bag.. never mind the groceries, I need an Orla shopping bag! ;o)

Bless him, he managed to procure one for me...


LOVE the pattern... LOVE that colour scheme! INSPIRED to create something!!

When you get into Stampin' Up!, a strange thing happens.. pretty soon you start thinking in SU! colours. When I saw this bag, I instantly thought Poppy Parade; Old Olive; Basic Grey; Chocolate Chip. Then I thought, how can I 'borrow' this design? Well, here's what I did:


  • Punch butterflies in the four colours
  • Stamp over each one in Whisper White Craft Ink using the damask stamp from the Bliss Sale-a-bration set.
  • Arrange them on a square of Very Vanilla cardstock, adhering with SNAIL adhesive.
  • Turn over and cut off the overhanging bits with a sharp craft knife.
  • Mount onto Poppy Parade card blank (mine was 5x5 inches square).
  • Add greeting 'hello' from Tiny Tags stamp set to one of the butterflies.

Now who said I couldn't do Clean & Simple?! (actually, it was me.) Well, it was a struggle, let me assure you (and I'm still tempted to go back and add bits).

I can see me coming back to this kind of simple design.. I admire it so much when I see it, so I'm not sure why I don't do it more often. Could be the way forward!


What kind of look do you prefer? Clean & Simple or Messy & Complicated?!

Sarah :o)

Thursday, 19 August 2010

Dabbling in the dirt

So, the Blog Hop on Sunday went less smoothly than the first one.. I'm so sorry if you tried to get round to see everyone's pages and came across problems here and there.. Nonetheless, there were again some beautiful scrapbook layouts to see and inspiring ideas to file away for future use!

I'd just like to share a page I made last week - it's of my two boys and their little friend, thoroughly absorbed in their game in a patch of dirt in the garden. Simple pleasures!


The papers are from the versatile Sweet Pea Designer Series Paper stack (£19.50 for 48 double-sided sheets - from the mini-catalogue). If you read this post last Saturday, you'll have seen close-ups of the chipboard lettering (On Board Loads of Letters - £10.25 for three 12x12" sheets) and the orange-red 'Friends' embellishment, made using the beautiful Vintage Vogue stamp set (£19.95 - from the mini-catalogue).

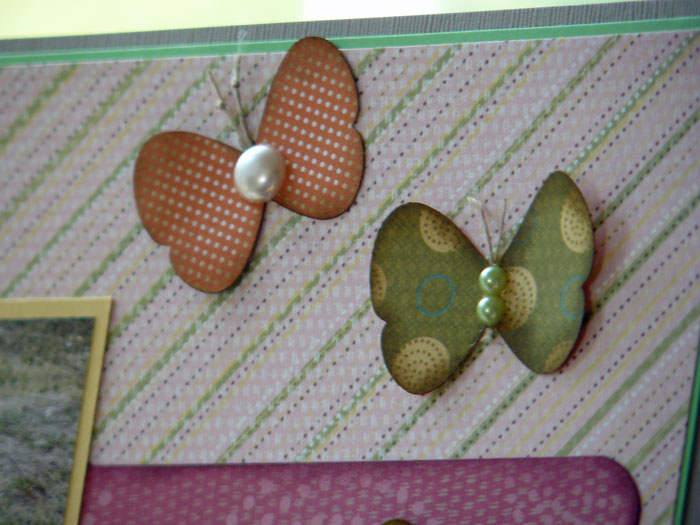
Here's a close-up of those butterflies:


These were punched, using the Butterfly punch (£12.50) from scraps of Sweet Pea papers, inked with Soft Suede ink and given antennae made from small pieces of Linen Thread (£3.25 for 13.7 metres). The gems are non-SU! but are very similar to those available in the Stampin' Up! Pretties Kit (£23.25 for a huge selection of flowers, pearls, beads and other lovely pieces).

If you are interested in buying any of the above products - or any others, of course - please don't hesitate to contact me and I'll be delighted to help you.

Thanks for visiting,

Sarah x

Thursday, 22 July 2010

Thank you, teacher!

It's the last day at nursery for my boys tomorrow, so I made a couple of quick Thank You cards for the staff who have been wonderful this year.

The first one was totally inspired by a box of chocs I spotted in the Co-op yesterday.. and just had to buy for Charlie's teacher, mainly because of the matching-card-making potential.


I was instantly thinking colour schemes.. 'Hmm, looks like Choc Chip, Cameo Coral and Very Vanilla'... shortly followed by.. 'Hey, I can use my new So Swirly wheel!'

Here's what I came up with, anyway. I couldn't resist adding a splash of Old Olive and some Sweet Pea felt pieces.


Supplies:
Cardstock - Cameo Coral, Chocolate Chip, Very Vanilla, Old Olive
Stamps - So Swirly wheel, Sincere Salutations
Inks - Cameo Coral, Chocolate Chip
Punches - Scallop Edge, Oval, Scallop Oval
Embellishments - Sweet Pea felt pieces, green rhinestones (non-SU!)

My second card had to be super-quick as I was running out of time this afternoon.


 Supplies:
Cardstock - Old Olive, Rose Red, Pumpkin Pie
Paper - Sweet Pea Designer Series Paper Stack
Stamps - Flight of the Butterfly
Punch - Butterfly
Embellishment - green rhinestones (non-SU!), Diamond Stickles (non-Su!)

You know what? In hindsight I think the second one is a bit plain.. it could do with something else.. more butterflies maybe.. perhaps a scrap of the patterned paper with a bit more 'going on'? Oh well, too late - it's been handed in!

Tuesday, 29 June 2010

Inspired by... a sparkly birthday card

I tend to hoard my birthday cards for years.. especially those ones which have a design I love (thinking 'I'll make something like that one day..'). Well, last night I actually did!

Here's the card I was inspired by...


And here's my interpretation...


Supplies:
Stamps - Baroque Motifs, Fun & Fast Notes (for the sentiment), Bird On A Branch (for the flowers on the butterfly)
Punches - SU! Butterfly (trimmed to change its shape slightly) and a tiny non-SU! butterfly
Cardstock - Whisper White, Rose Red
Ink - Versamark
Embossing Powder - Stampin' Emboss Black
Glitter - Pink (non-SU magazine freebie)
Sequins and black adhesive pearls - from stash

Techniques:
The swirl was stamped on Whisper White cardstock with Versamark and embossed with black embossing powder. I used my new (and fantastic!) Stamp-a-ma-jig to get the swirl exactly where I wanted it.


The panel was layered on to Rose Red cardstock and again on to an A6 folded card of Whisper White.


I punched the butterfly from Rose Red card, folded and trimmed it a little, before adding the stamped flowers and a little glitter.

I added some iridescent flower sequins and some glitter glue for a bit of sparkle. :o)

One thing I learned... I need an Embossing Buddy! This is an anti-static thingie that you rub across your paper before embossing to stop the powder sticking where you don't want it to. Add it to my list...

Thanks for reading!

Sarah x

Sunday, 20 June 2010

Happy Father's Day!

It's been a busy week but I just about managed to get a couple of Father's Day cards completed in time (well almost... sorry Dad, yours will arrive tomorrow). I used more of the gorgeous papers from the Sweet Pea paper stack, along with the Butterfly and Two-Step Bird punches. The letters were cut using the Cuttlebug and Red Tag Sale alphabet dies, then embossed using Cuttlebug embossing folders.


I'm loving these papers - such a great combination of colours and patterns!

Thanks for visiting..

Sarah x

Saturday, 19 June 2010

My first workshop...

I have to admit I was pretty nervous in the run-up to my first home workshop.. but I really needn't have worried! Teresa was the perfect hostess and I knew several of the guests already from the Hailsham crop. Unexpectedly, though, the ladies were so absorbed by the Idea Book & Catalogue and my card samples that we just didn't get around to making anything! It was a fun evening nonetheless, and I can't wait to see what my first customers create with their new Stampin' Up! purchases.

Here's a layout I made recently using the versatile 'Sweet Pea' double-sided paper stack. It features my first son as a nine-month-old (aah, he was so cute!).


Supplies:
Cardstock - Whisper White, Bashful Blue, Chocolate Chip, Old Olive
Papers - Sweet Pea paper stack
Stamps - My Sweet Pea
Punch - Butterfly; Eyelet Border
Ink - Versamark
Other - White Embossing Powder, Button, Thickers letter stickers, sheer white ribbon, Liquid Pearls

Techniques:
I misted the butterfly with water and scrunched it up, unfolded it and allowed it to dry.
The flowers were stamped with Versamark and embossed with white embossing powder.

I'll be back tomorrow with a Father's Day card..

Thanks for looking!

Sarah x

Sunday, 13 June 2010

My first card-making class!

Well, after lots of nervous anticipation and frantic last-minute advertising, I held my first card-making class on Friday. Although it was not a sell-out, my ladies spent a very pleasant couple of hours making some beautiful cards and trying out a variety of stamps, punches and techniques. They were delighted with what they'd made!

I didn't think to take my camera with me to photograph their creations, but here are the cards I demonstrated for the ladies to make themselves:


Supplies:
Stamps - 'Fun & Fast Notes' set
Cardstock - Earth Elements colour family, Very Vanilla
Ribbon - Very Vanilla grosgrain
Ink - Black Staz-on
Colouring - Stampin' Pastels
Punch - Scallop Edge

The image was coloured by dabbing gently with Stampin' Pastels, which coordinate perfectly with the Earth Elements cardstock colours.

Here's the second card we made:


A close-up of the details...


Supplies:
Stamps - 'Bird On A Branch' set
Cardstock - Earth Elements colour family, Whisper White, Basic Black
Ink - Basic Black, Ruby Red, Cameo Coral
Ribbon - Black & White Gingham
Punch - Butterfly
Other tools - Paper Piercer


The class included full tuition on all the techniques used, along with all materials needed to make each of these cards, including envelopes and protective cellophane card bags.

The next class is on Friday 9th July and we'll be playing with the Sweet Pea collection of papers and stamps (click on the Mini-Catalogue button on the right to see the Sweet Pea collection - it's gorgeous!).

If you'd like to join in next month, please get in touch - leave a comment here or email me on slpiggott73@gmail.com.

Hope to see you then!

Sarah x

Friday, 4 June 2010

Welcome to my new obsession.. Stampin' Up!

Welcome to my new blog! As you'll see, it's all about my new venture into the world of Stampin' Up!

I was introduced to Stampin' Up! (or SU as I'll be calling it) by my scrapbooking and cardmaking friend, Pat, some months ago when I was still in Croydon. She became a SU demonstrator back in January and has been enjoying wonderful success with her cardmaking classes. I've been thinking about becoming a demonstrator myself for quite some time - and now we've achieved our dream relocation to Eastbourne, the time feels right.

So here I am.. a new Stampin' Up! demonstrator, living by the seaside and doing what I love.. playing with paper, stamps and ink.. what could be better?!!

I took delivery of a thrilling box of goodies yesterday.. and here are a couple of cards I made this afternoon.


Stamp set: Basic Phrases
Punch: Extra Large Two-step Bird
Cardstock: Very Vanilla; Summer Sun; Pumpkin Pie


Stamp sets: Basic Phrases; Bird On A Branch
Punches: Butterfly; Scallop Edge
Cardstock: Very Vanilla; Chocolate Chip
Ribbon: 1/4" Grosgrain - Very Vanilla

I'm off to a crop in Hailsham tomorrow so I'll be back soon to share what I make there.

Thanks for looking!

Sarah x