Upcoming Classes

Thursday 9th June: 10.00-12.30: Cardmaking.. cards for men using the Plane & Simple stamp set.
Thursday 23rd June: 9.30-12.30: Scrapbooking.. we'll be continuing with our 8"x8" mini book, theme: Book of Me!
Showing posts with label On Board Loads of Letters. Show all posts

Sunday, 27 February 2011

Scrapbooking with Greenhouse Gala DSP

Oops! For some reason I forgot to share these scrapbook pages.. I did them back in November for Scrapbook Magazine and they were published in issue 52 last month. Most of the papers used were from the Greenhouse Gala Designer Series Paper pack - love the colours and patterns in these papers!

Baby Me:


The hearts were stamped on lined paper from Greenhouse Gala DSP using stamps from the Punch Potpourri Hostess set. I coloured the chipboard letters with Baja Breeze ink and added Crystal Effects for a glossy, raised effect.

@ 37:


The butterfly is also from the Punch Potpourri Hostess set (by the way, you can earn this set FREE when you host a workshop).

Chalk & Cheese:

The green spotty paper on the left was actually from the Jolly Holiday DSP pack - but it seems to go nicely with the Greenhouse Gala paper! These little birds were punched using the gorgeousTwo-Step Bird punch and decorated with buttons from the Brights Designer Buttons pack (£7.75 for 72 buttons).

Thanks for visiting!

Sarah x

Sunday, 5 September 2010

Retiring Stamps and Colours - Blog Hop

Hi there, and if you came from Hayley's blog, welcome to your last stop on this morning's Blog Hop! For those who may have arrived here from my other blog, Paper Obsession, thank you so much for popping across - I'm delighted you made it!

So today we're highlighting some of the beautiful colours and stamp sets that will be retiring at the end of the month (boo hoo.. we'll miss you!).. if you want any of the products feautured, you'll need to get in quick.. once they're gone, they're gone!

First I'll show you a New Baby card I made using the gorgeous Nursery Necessities stamp set. I love this set so I have to admit I'm really sad to see it go!

This card was totally inspired by one I saw in the 2009-2010 Idea Book & Catalogue.. I just adapted it with my choice of stamps and colour scheme. I made the paper frill by cutting a long strip of Cameo Coral card (approx 2cm wide) and scoring alternately at 2cm then 1cm intervals, repeating along the length of the strip, then folding concertina-style. I stuck the frill down with Sticky Strip tape and tied Linen Thread around it.

Colour Scheme:
  • Close to Cocoa (A6 base card and stamped greeting)
  • Cameo Coral (frill and stamped elephant)
  • Apricot Appeal (lower half of card and elephant's ear)
  • Barely Banana (stamped moon and stars)
Stamps etc:
  • Nursery Necessities stamp set
  • Sticky Strip double-sided tape
  • Linen Thread
  • Corner Rounder Punch

My second project is a scrapbook page featuring a photo of my little boy, Harry, as a baby. I love scrapbooking with black and white photos as you have so much freedom in choosing your colour scheme!


I chose the lovely Barely Banana, Ruby Red and Basic Black. My Barely Banana cardstock was A4 size - to make it 'stretch' to a 12x12" layout, I trimmed the long side of two sheets to 11.5 inches, then cut the second sheet to the correct width and stuck it below the first one. I used the Striped Grosgrain Ribbon both as a design feature and to cover the join!


The black letter border at the bottom of the page was created using the Stampin' Around Nursery Letters wheel (also retiring) - I got it straight using the fantastic Stampin' Around Wheel Guide. The stars are part of the Nursery Necessities set I used in the New Baby card above. I cut out the larger one using the coordinating Stampin' Up! Star Punch.. easy!


My journaling labels were made using another retiring stamp set, Frames with a Flourish, stamped in Basic Black and Ruby Red ink. Such a versatile set both for cards and scrapping! The title letters are On Board Loads of Letters - bare chipboard letters which I inked with Basic Black ink.


Do you like the hat pin with pearls and clear beads? I made this up using the Pretties Kit I got last week - and this is retiring too (I can't quite believe it)! This kit consists of a tin crammed full of alterable white flowers, halfback pearls, round pearl beads (in cream and white), clear beads, rhinestone brads, hat pins and silver spacer beads. The kit is £23.25 but when you see how much is in it, you'll realise it's great value.

Colour Scheme:
  • Barely Banana
  • Ruby Red
  • Basic Black, Whisper White (not retiring)
Stamps etc:
  • Nursery Necessities stamp set
  • Nursery Letters Stampin' Around Jumbo Wheel
  • Stampin' Around Wheel Guide
  • Frames with a Flourish stamp set
  • On Board Loads of Letters
  • Pretties Kit
  • Basic Black Striped Grosgrain Ribbon (3.2cm)
  • Star Punch
  • Spiral Punch

I hope you enjoyed the Blog Hop.. and got a better idea of some of the beautiful products that are available just til the end of September. If you've seen anything you'd like to buy, please don't hesitate to contact me or any of the other girls on the blog hop - we'd be delighted to help!

Thank you so much Debbi for organising the Hop - if you didn't reach me via the Hop but would like to see everyone else's work, now's the time to pop across to Debbi's blog where it all starts. Thanks for joining me!

Sarah x

Thursday, 19 August 2010

Dabbling in the dirt

So, the Blog Hop on Sunday went less smoothly than the first one.. I'm so sorry if you tried to get round to see everyone's pages and came across problems here and there.. Nonetheless, there were again some beautiful scrapbook layouts to see and inspiring ideas to file away for future use!

I'd just like to share a page I made last week - it's of my two boys and their little friend, thoroughly absorbed in their game in a patch of dirt in the garden. Simple pleasures!


The papers are from the versatile Sweet Pea Designer Series Paper stack (£19.50 for 48 double-sided sheets - from the mini-catalogue). If you read this post last Saturday, you'll have seen close-ups of the chipboard lettering (On Board Loads of Letters - £10.25 for three 12x12" sheets) and the orange-red 'Friends' embellishment, made using the beautiful Vintage Vogue stamp set (£19.95 - from the mini-catalogue).

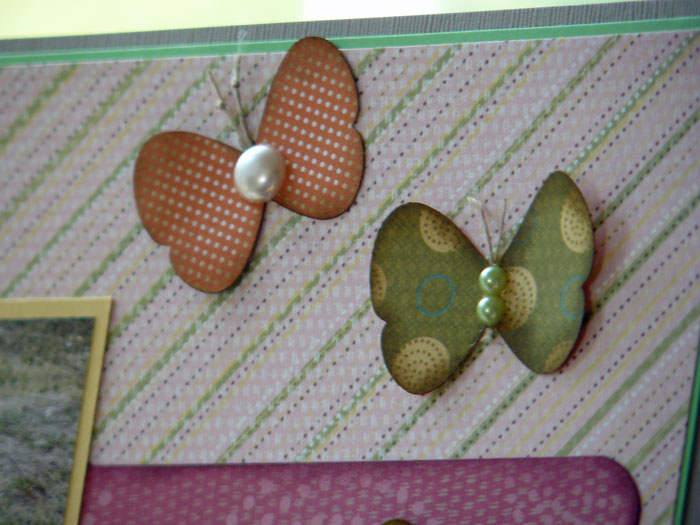
Here's a close-up of those butterflies:


These were punched, using the Butterfly punch (£12.50) from scraps of Sweet Pea papers, inked with Soft Suede ink and given antennae made from small pieces of Linen Thread (£3.25 for 13.7 metres). The gems are non-SU! but are very similar to those available in the Stampin' Up! Pretties Kit (£23.25 for a huge selection of flowers, pearls, beads and other lovely pieces).

If you are interested in buying any of the above products - or any others, of course - please don't hesitate to contact me and I'll be delighted to help you.

Thanks for visiting,

Sarah x

Saturday, 14 August 2010

Ideas for Scrapbook Title Lettering... Part 1

Three products I can't be without at the moment for scrapbooking are the On Board Loads of Letters (three 12x12" sheets of bare chipboard letters - £10.25), Sponge Daubers (12 for £7.75) and Crystal Effects (£4.95). I've used them on my last few scrapbook pages and can see them featuring again and again!

On some pages, naked chipboard letters will look just right - clean, natural, understated.. but on other occasions you might want to match your alphas to your colour scheme. The easiest way I have found to colour my chipboard is to simply press the letter (or shape) into an ink pad. Press all over with your finger, then lift it up to check the coverage. Repeat until the letter is covered to the intensity you want. In the example below, I pressed really firmly into the ink pad for an intense effect. If you want to cover the edges, you could use a Blender Pen or a cotton bud to take up some ink and dab it round the edges and into all the little crevices.


You can get a lovely two-tone look by pressing just half of your chipboard shape down onto your first inkpad, then repeating with the other half on a second colour. Make sure you start with the lighter colour of ink to avoid contaminating pale inkpads with dark ink.


In the example above, when the ink was dry I added Champagne Shimmer Paint using a Sponge Dauber to add a delicate touch of sparkle to my title.

Sponge Daubers are a brilliantly versatile tool! They are great for picking up colour from an ink pad and creating distressed inky effects on the edges of cardstock, patterned paper.. and your chipboard letters! In the following example, I started by colouring the letters with Pretty in Pink ink. Once dry, I dabbed them with a Sponge Dauber coated in Soft Suede ink for a dirty, muddy effect.


See those little 'raindrops' on these letters..? These are tiny drops of Crystal Effects applied to look like splashes of water.

You can also completely coat your chipboard with Crystal Effects for a dimensional, glossy look. In the following example - a chipboard heart - I coloured with Ruby Red ink, allowed to dry, then carefully applied Crystal Effects all over. be warned - you need to let it dry thoroughly before attempting to stick it to your layout!


I've also applied Crystal Effects to the letter F (from Vintage Vogue set) to produce a shiny, raised effect. {Incidentally, I achieved the two-tone effect by inking the stamp first with So Saffron ink, then adding Ruby Red ink with a Sponge Dauber!}

I hope you've found this useful.. and if you'd like to purchase any of the products featured above, don't hesitate to get in touch.

Look out for Part 2 - Using Alphabet Stamps in your Titles - coming soon.


Meanwhile - there'll be another Stampin' Scrapping Blog Hop tomorrow - Sunday 15th August - starting HERE at 10:00am.. I hope you'll check it out - it's sure to be fabulous!

Sunday, 1 August 2010

Welcome to the Two-Step Stampin' Scrappin' Blog Hop!!


Happy Sunday.. it's 1st August, which means Stampin' Up!'s 'Two-Step into Fabulous' special promotion starts today! As explained in my previous post, Stampin' Up! are offering a delicious 20% off selected Two-Step Stampin' sets from 1st to 31st August.

In Two-Step Stamping, an image is made up from two separate stamps. This enables the two parts of the image to be stamped in different colours, or shades of the same colour, giving the image that extra dimension and impact!

Though fantastic for card-making, these stamps sets are also perfect for your scrapbooking - and today I'd like to present a very special Two-Step Stampin' Scrappin' Blog Hop to show you how these lovely sets can be used on your layouts.

We have ten blogs for you to work your way round, starting here! Each blog will contain a link to the next one on the Hop.. but if there are any problems with links, you'll find the full list at the end of this post.

Meanwhile, here's my scrapbook page:


All of the papers used are from the Sweet Pea Designer Paper stack. I stamped the Greenhouse Garden flowers, starting with a pale colour, then rolling the edges over a darker ink pad to add some contrast (this is called the 'rock & roll' technique!). I then used the Stamp-a-ma-jig tool to perfectly align the second stamp on top of the first. This adds the darker details to the flowers.


I added glitter glue to the flower centres, curled them a little, then mounted them on foam pads. The chipboard letters were pressed onto a Cameo Coral inkpad, then covered in glitter glue.

I made the tags from scraps of Sweet Pea papers, rounding the corners and inking the edges. The scalloped part was made using the Scallop Oval punch and folding in half. 'Photo' was stamped with the Just Perfect alphabet stamps. I love this set - it's just perfect for titles!


OK.. so your next stop on the Hop is to Stamping Scene, where Zoe will be using Greenhouse Garden and Big Bold Birthday stamp sets.

In case you get lost on the way, the full list is below:


1. Seaside Stampers (Sarah) - Greenhouse Garden
2. Stamping Scene (Zoe) - Greenhouse Garden
3. Creativity Is Key (Emma) - Loads of Love
4. Cards and Creations (Pat) - Trendy Trees
5. Stampin' the City (Cheryl) - Bird on a Branch and Tiny Tags
6. Taylor-Made Cards (Debbi) - Trendy Trees and Tiny Tags
7. Make, Do and Gem (Gemma) - Greenhouse garden
8. Tea Cup Designs (Karin) - Loads of Love
9. Stampaholix (Carolyn) - Greenhouse Garden
10. Feeling Crafty (Bekka) - Greenhouse Garden, Tiny Tags and Bird on a Branch

Have fun, and thanks so much for your visit!!

Sarah x


P.S. There'll be another Hop on 15th August.. hope to see you then!