Hello!
I hope you had a wonderful Easter break.. we had a lovely few days with my parents with LOTS of beaches, sand and picnics.. great fun! But now it's back to work and school.. and there's just time to share a sneak preview of the project we'll be making at this coming Thursday's Scrapbook Club. It's called a tri-shutter mini album.. looks fiendishly complicated but it's really not too difficult!
My album uses papers from the Nursery Suite Specialty DSP, along with a few of the matching Quick Accents (self-adhesive die-cuts).
A close-up of the inside of the album..
I think you can see this larger if you click on the photo.. but it shows you how the album looks when it's standing up.
The class is on Thursday 28th April from 9.30am to 12.30pm and costs £15. I have a couple of spaces left if you would like to join in. You'll be able to choose from a wide range of colours and Designer Series Papers to make your album, depending on its theme. You'll also get to use my lovely new Big Shot and dies, including the gorgeous and so-versatile Timeless Type Junior Alphabet dies (I used these for my title 'baby charlie').
Please contact me by Wednesday morning if you would like to join in with this class.. and expect some extra yummy cakes on Thursday as it's my birthday.. just promise you won't ask how old I am.. ;o)
Upcoming Classes
Thursday 9th June: 10.00-12.30: Cardmaking.. cards for men using the Plane & Simple stamp set.
Thursday 23rd June: 9.30-12.30: Scrapbooking.. we'll be continuing with our 8"x8" mini book, theme: Book of Me!
Monday, 25 April 2011
Wednesday, 20 April 2011
How to make a monster!
Had such a lovely day yesterday, reading Cath Kidston's latest catalogue/magazine in the sunshine, boys playing happily together.. ahhh, bliss! Then I spotted a reader's letter that spurred me into immediate action. The idea was (sort of) this: get your little ones to draw a monster, then recreate said monster in fabric.. i.e. make a cuddly version of their drawing!
Charlie and Harry loved the idea and were more than happy to play along. So here's Charlie's drawing:
Basically a sausage-shaped creature with wonky arms, spiky hair and a big smile. After choosing a scrap of fabric, ribbons and buttons (free with a magazine).. and a lot of trial and error.. here's what I managed to produce:
Charlie loves it.. and has named it Mr Flowery Monster. Perfect!
With barely time to catch my breath, I was ordered back upstairs to the craft room to find fabric for Harry's monster. He chose a beautiful Melon Mambo-esque pink (to my surprise.. it's normally blue all the way with Harry). This time I thought I'd capture the process and learn from my many mistakes..
Here's Harry's design:
... and here's what to do!
1. Trace the design onto tracing paper, cut it out and pin it to two layers of fabric, good sides on the inside. Cut out the design, leaving a centimetre all round.
2. Sew eyes, nose and mouth (as dictated by the design) on to the front piece of fabric. Remember to leave enough room around the edge for hemming.
3. Turn the two pieces back-to-back again and tack around the edges, leaving the bottom edge open. If you are including ribbons for hair or limbs, tuck these in as you tack around... remember the long parts should be INSIDE at this stage! (Yes.. I didn't do this the first time..). Sew around edges with sewing machine, reinforcing the parts with ribbons sticking out (or just sew round the whole lot twice).
Sorry - forgot to take picture of this stage!
4. Turn monster inside-out and check everything is in the right place. Correct things if, like me, you messed up ;o)
5. Stuff with toy stuffing and sew up the bottom edge, adding ribbon legs if desired.
Voila!!! Meet Mr Pink Monster! I'm delighted to say, Harry loves him.
All buttons and ribbons on this one were from Stampin' Up!
Hope you like my monsters too!
Sarah x
Tuesday, 19 April 2011
Fun with Stampin' Around Wheels
I really enjoy making cards with Stampin' Up!'s Stampin' Around Wheels - they make it so easy to produce a quick but effective card. Here are a couple of cards I made recently using the Jumbo Wheels 'Very Vintage' and 'Baby Tees'.
This one (above) uses the Very Vintage Jumbo Wheel and Tiny Tags stamp set, along with Love Letter Designer Series Paper and Linen Thread. The colour scheme is Very Vanilla, Basic Black and Riding Hood Red. I also used the Jewellery Tag and Scallop Trim Border punches. To make sure my stamping didn't go wonky, I used the Stampin' Around Wheel Guide - an essential tool for straight stamping with the Wheel!
To see more cards made with the Very Vintage wheel, check out this post.
This card was made using the Baby Tees Stampin' Around Jumbo Wheel. I rolled the wheel along a couple of pieces of Whisper White cardstock, then coloured and cut out two of the little vests. I mounted these onto my other stamped piece using Stampin' Dimensionals foam pads. The colour scheme is Marina Mist, So Saffron and Certainly Celery. The card was for twin boys so I typed and printed a personalised greeting on Whisper White cardstock and stuck it in a strip along the base of the card.
Hope you like them!
Sarah x
This one (above) uses the Very Vintage Jumbo Wheel and Tiny Tags stamp set, along with Love Letter Designer Series Paper and Linen Thread. The colour scheme is Very Vanilla, Basic Black and Riding Hood Red. I also used the Jewellery Tag and Scallop Trim Border punches. To make sure my stamping didn't go wonky, I used the Stampin' Around Wheel Guide - an essential tool for straight stamping with the Wheel!
To see more cards made with the Very Vintage wheel, check out this post.
This card was made using the Baby Tees Stampin' Around Jumbo Wheel. I rolled the wheel along a couple of pieces of Whisper White cardstock, then coloured and cut out two of the little vests. I mounted these onto my other stamped piece using Stampin' Dimensionals foam pads. The colour scheme is Marina Mist, So Saffron and Certainly Celery. The card was for twin boys so I typed and printed a personalised greeting on Whisper White cardstock and stuck it in a strip along the base of the card.
Hope you like them!
Sarah x
Friday, 15 April 2011
April's Card Class: Easter Cards and Gifts
Thank you to the ladies who attended my Easter card class last week! Just a quick post to share what we made:
So here are the cards:
(This one was inspired by a card I was very kindly sent by Scraphappy Jackie to put on my display board.. thank you Jackie, your cards were wonderful!)
..and here are the Easter basket and gift bags:
The toppers on the gift bags were made using the new Top Note die in the Big Shot (I LOVE my new Big Shot so much!!).. the pink one was then embossed with the Perfect Polka Dots embossing folder. The rabbit stamp is from the Forest Friends stamp set.. a perfect Easter bunny I think!
So here are the cards:
(This one was inspired by a card I was very kindly sent by Scraphappy Jackie to put on my display board.. thank you Jackie, your cards were wonderful!)
..and here are the Easter basket and gift bags:
The toppers on the gift bags were made using the new Top Note die in the Big Shot (I LOVE my new Big Shot so much!!).. the pink one was then embossed with the Perfect Polka Dots embossing folder. The rabbit stamp is from the Forest Friends stamp set.. a perfect Easter bunny I think!
Tuesday, 12 April 2011
Tea, Cake & Craft Party make and takes
So here's what I got the ladies making at the Tea, Cake & Craft Party last Saturday..
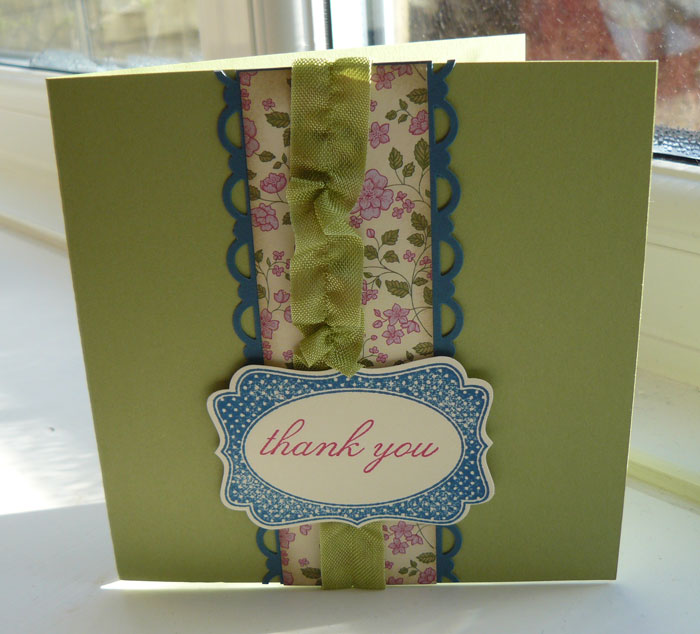
Cards.. using Springtime Vintage Designer Series Papers, gorgeous Seam Binding, the new Four Frames stamp set and coordinating Decorative Label punch:
Scrapbook pages... using all sorts of Designer Series Papers, along with brand-new Beautiful Wings Embosslits - the ladies were able to choose whatever papers they fancied to suit their photos, and came up with some fabulous layouts! Here's my example:
Gift bags... made with a piece of A5 sized cardstock, scored, folded, punched and stuck together, then decorated with punched out flowers and ribbon:
Thanks for visiting!
Sarah x
Cards.. using Springtime Vintage Designer Series Papers, gorgeous Seam Binding, the new Four Frames stamp set and coordinating Decorative Label punch:
Scrapbook pages... using all sorts of Designer Series Papers, along with brand-new Beautiful Wings Embosslits - the ladies were able to choose whatever papers they fancied to suit their photos, and came up with some fabulous layouts! Here's my example:
Gift bags... made with a piece of A5 sized cardstock, scored, folded, punched and stuck together, then decorated with punched out flowers and ribbon:
Thanks for visiting!
Sarah x
Tuesday, 5 April 2011
Tea, Cake and Craft Party update
A belated update on the Tea, Cake & Craft Party (now I've recovered..)! We had 20 lovely people here, drinking tea, eating the most scrumptious home-made cakes (a HUGE thank you to all who made cakes for the occasion), and of course crafting!
The calm before the storm..
Another massive thank you to those wonderful ladies who helped out by making teas, washing up the mugs and generally making sure everyone was happy.. you truly made the event a success and I could not have coped without you!
It was a very busy morning but the feedback I've received from those who attended has been really positive so I'm absolutely delighted that all the work was worth it. We raised approximately £85 for The Eve Appeal - pretty good I think!
There were around ten ladies for each session, making cards, scrapbook pages and finally little gift boxes. It was lovely to see how people used my designs for inspiration, adding their own touches.. or totally went their own way.. fantastic!
The winners of the Prize Draw were...
Janette - 'So Happy for You' stamp set
Eve - Set of six hand-made cards in a box (see picture below)
Claire - Body Shop Coconut Shower Cream (courtesy of Helen Ridley, Body Shop Consultant - thank you Helen!)
Here are those cards that Eve won..
..and their little gift box..
The butterfly stamp is from the beautiful Strength & Hope stamp set. Stampin' Up! are donating £1 to the Breast Cancer Research Foundation from every purchase of this stamp set.
I'll be back soon with more crafty pictures from Saturday..
Sarah x
Saturday, 2 April 2011
Mini Catalogue Blog Hop
Hello and welcome to my blog! If you came via the Mini Catalogue Blog Hop, you'll have come from Sharon's 'My Ink Pad'..
I've been crazy busy these last couple of weeks preparing for my Tea, Cake & Craft Party which should be happening right about now! So I thought I'd show you a couple of projects we'll be making today using products from the wonderful Mini Catalogue.
First, here's a scrapbook page I made using the beautiful Springtime Vintage DSP:
Want a closer look?
Love that Seam Binding ribbon! I've also used the new Four Frames stamps plus the matching Decorative Label punch; Strength & Hope butterfly on the background; and Beautiful Wings Embosslits for the tiny butterflies.
I do love that Springtime Vintage DSP - as soon as I saw it I had the notion of making some bunting with it. Here it is in progress..
Note the Seam Binding again.. this one is Rose Red. And here's the finished article hanging proudly on the mantelpiece!
Next is a card I made using the lovely Sweet Stitches DSP along with those Beautiful Wings Embosslits again.. well they are cute, aren't they!
Also using the Sweet Stitches DSP.. a little box for pins. :o) It's actually a little box I bought from Ikea ages ago with the idea of altering in some way.. and at last I've had a go! The button is one of the Big Designer Buttons in the Sweet Stitches range.
OK, that's it from me! Your next stop on the Blog Hop is Jayne at Mad About Stamps... have fun, and thanks for visiting!
Sarah x
I've been crazy busy these last couple of weeks preparing for my Tea, Cake & Craft Party which should be happening right about now! So I thought I'd show you a couple of projects we'll be making today using products from the wonderful Mini Catalogue.
First, here's a scrapbook page I made using the beautiful Springtime Vintage DSP:
Want a closer look?
Love that Seam Binding ribbon! I've also used the new Four Frames stamps plus the matching Decorative Label punch; Strength & Hope butterfly on the background; and Beautiful Wings Embosslits for the tiny butterflies.
I do love that Springtime Vintage DSP - as soon as I saw it I had the notion of making some bunting with it. Here it is in progress..
Note the Seam Binding again.. this one is Rose Red. And here's the finished article hanging proudly on the mantelpiece!
Next is a card I made using the lovely Sweet Stitches DSP along with those Beautiful Wings Embosslits again.. well they are cute, aren't they!
Also using the Sweet Stitches DSP.. a little box for pins. :o) It's actually a little box I bought from Ikea ages ago with the idea of altering in some way.. and at last I've had a go! The button is one of the Big Designer Buttons in the Sweet Stitches range.
OK, that's it from me! Your next stop on the Blog Hop is Jayne at Mad About Stamps... have fun, and thanks for visiting!
Sarah x
Subscribe to:
Posts (Atom)